
I decorated my first strawberry layer cake for a friend’s bridal shower in 2019 and watched three guests photograph it before the bride cut a single slice. That experience taught me that strawberry cake decorating isn’t about complexity.
Strawberry cake decorating is one of those skills that separates a forgettable dessert from a crowd-stopping centerpiece.
Before you touch a single berry, understand this: every decision in strawberry cake decorating is a visual one — symmetry, color balance, and texture speak before anyone takes a bite.
Why Strawberry Cake Decorating Demands a Different Mindset Than Other Fruit Cakes:
Strawberries are bold. Their red-to-pink gradient is inherently dramatic, which means strawberry cake decorating doesn’t compete — it complements. The fruit is already a statement.Cut berries weep juice within 30 minutes, bleeding into buttercream and turning a pristine cake amateur fast. This reality shapes everything — from berry selection to exact placement timing.
The difference between a $10 grocery-store piping kit and an ATECO 847 tip is immediately visible. Build your kit with intention before your first serious strawberry cake decorating session.
- A rotating cake turntable — the ATECO 12-inch with a non-slip base for smooth, controlled rotation that makes clean borders and drip lines far easier to execute.
- Offset spatulas in two sizes — a 9-inch for broad strokes and a 4-inch for detail work around berry placement.
- A metal bench scraper — essential for a sharp, straight-edged finish before placing a single berry.
- Piping tips 1M, 2D, and 32 — three tips covering 90% of piping needs in strawberry cake decorating: rosettes, rope borders, star clusters.
- Parchment squares under each berry during staging — lets you pre-set arrangements and slide an entire cluster onto a chilled cake in one smooth, controlled motion.
Mastering Buttercream for Every Style of Decoration:
The frosting is the foundation of any strawberry cake decorating project. Everything placed on top either succeeds or fails based on buttercream consistency, color, and surface texture — those three variables before a single berry is lifted. Four major buttercream types are used in professional work, each with different structural properties and working temperatures. The choice depends on your climate, serving conditions, and the style you’re attempting.
1: American Buttercream
American buttercream (ABC) is the workhorse of home baking. Stiff and forgiving, it holds piped details in warm rooms up to 78°F. The drawback is sweetness — in strawberry cake decorating, a full ABC coat can overwhelm delicate berry flavor.
2: Swiss Meringue Buttercream
Swiss meringue buttercream is preferred for high-end strawberry cake decorating. It’s silkier, less sweet, and accepts strawberry puree without breaking. SMBC softens faster than ABC, so plan your session around a chilled cake.
3: Cream Cheese Frosting
Cream cheese frosting is structurally unstable for complex work but exceptional on flavor. Use it for naked or semi-naked styles only. Don’t attempt drip cakes or piped rosettes with it — it won’t hold shape.
4: Ermine Frosting
Ermine frosting (flour-based) is underused in strawberry cake decorating. Less sweet than ABC, more stable than SMBC at warm temperatures, and photographable smooth. Worth learning if you shoot your own cake content.
Fresh Strawberry Prep — The Details Most Tutorials Skip:
Rushing berry prep is one of the most common reasons the finished product looks sloppy. These five practices separate amateur prep from professional execution.
- Dry completely before cutting — wash two hours ahead and air-dry on a sheet pan; surface moisture accelerates color bleeding dramatically.
- Grade by size — large berries on top, medium for side accents, small or irregular ones into jam or filling.
- Use a sharp paring knife only — serrated edges tear cell walls and speed up juice release significantly.
- Brush cut surfaces with warm apricot jam thinned with water — seals the cut face and buys 60 to 90 extra minutes of clean presentation time.
- Always source 20% more berries than planned — decoration sessions produce casualties: berries that roll, slices too thick, pieces that just don’t fit.
Classic Decoration Styles and When to Use Each One:
The style you choose should match the occasion and how many hours pass between decoration and presentation. There are five distinct visual approaches in strawberry cake decorating, each with a specific use case.
When choosing between these styles, the most practical question is: how many hours will pass between decoration and serving? That answer eliminates two or three options immediately. Drip cakes need refrigeration and work best placed within two hours of the event. Your timeline shapes every decision that follows.
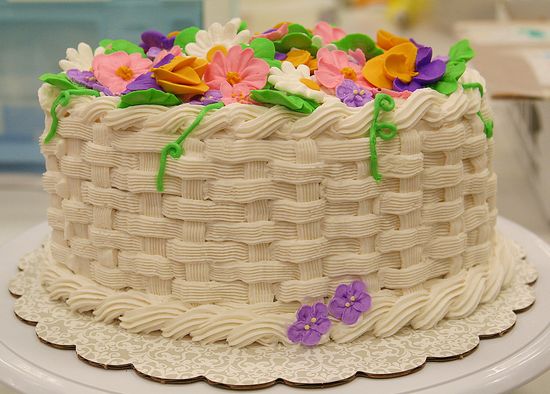
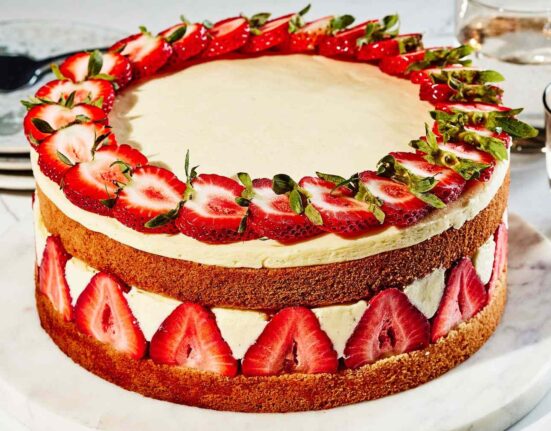
1: The Full Rosette Crown
A full rosette crown places piped buttercream rosettes in concentric rings across the cake top, with a fresh strawberry in each rosette’s center. It’s the most popular style in American strawberry cake decorating — it photographs well and reads as celebratory. Best for birthdays and bridal showers.
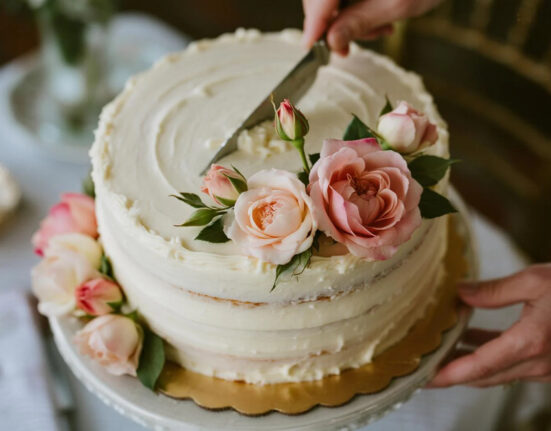
2: The Naked or Semi-Naked Style
The naked cake exposes layers through a thin, intentionally uneven coat. This strawberry cake decorating approach leans on the fruit’s natural beauty — sliced berries between visible strata, whole berries cascading down one side. Best for rustic weddings and outdoor events.
3: The Drip Cake Method
White chocolate ganache drips over smooth buttercream with strawberries at drip points. Ganache temperature must be exact — too warm and it runs, too cool and it clumps. Best for teen birthdays and portfolio work.
4: The Mirror Glaze Finish
A strawberry mirror glaze — gelatin, condensed milk, white chocolate, and berry puree — creates a hyper-reflective surface that makes the cake look almost surreal. One perfectly chilled cake, precise timing, one confident pour with no do-overs. Best for competition cakes and editorial photography.
5: The Stacked Fruit Cascade
Whole and halved strawberries trailing from the top down one side — simple in concept, tricky to execute neatly. Toothpick anchoring at the curve point is essential — best for garden parties and Mother’s Day.
Color Palette Planning for Maximum Visual Impact:
Color choices in strawberry cake decorating go far beyond picking a pink frosting. Use color relationships deliberately — complementary, analogous, or triadic — to make the fruit pop.
- Sage green + cream white — the most photographed combination; the green reads as natural and cream flatters red better than stark white
- Dusty rose + antique gold — excellent for wedding-adjacent events where elegance matters more than playfulness
- Pale lavender + white chocolate — unexpected but effective; lavender makes red strawberries look almost luminescent
- Champagne + ivory — the safest beginner palette; nothing clashes and the strawberries carry all the visual weight
- Deep burgundy + matte black — dramatic, editorial, photographs well under artificial lighting; a completely different energy than every other option listed above
| Style | Skill Level | Best Occasion | Advance Prep Time | Strawberry Type | Decoration Time |
| Full Rosette Crown | Beginner–Intermediate | Birthdays, Showers | 1–2 hours before | Fresh whole + halved | 30–45 min |
| Naked/Semi-Naked | Beginner | Rustic Weddings | 2–3 hours before | Fresh sliced + whole | 20–30 min |
| Drip Cake | Intermediate | Birthdays, Portfolios | 30–60 min before | Fresh whole | 45–60 min |
| Mirror Glaze | Advanced | Competition, Editorial | Same day only | Freeze-dried accents | 60–90 min |
| Stacked Cascade | Intermediate | Garden Parties | 1 hour before | Fresh mixed sizes | 30–40 min |
| Chocolate-Dipped Accents | Beginner | Any Occasion | 24 hours advance | Chocolate-dipped fresh | 20–30 min |
| Fondant with Berry Accents | Advanced | Formal Events | 24–48 hours advance | Artificial/freeze-dried | 90–180 min |
Chocolate-Dipped Strawberries as Decorating Elements:
Chocolate-dipped strawberries are one of the highest-ROI techniques in strawberry cake decorating. They look expensive, they’re structurally stable, and can be prepared 24 hours in advance.
Compound coating (candy melts) is more stable than standard dipping chocolate and doesn’t require tempering. For professional gloss, use properly tempered Callebaut white chocolate — sharp snap finish rather than matte.
1: Dipping Technique for Cake-Ready Berries
Dry your strawberries completely — surface moisture causes chocolate to seize or slide. Dip at 45 degrees, let excess drip for five seconds, rest on parchment. Let them set at room temperature before chilling.
2: Decorating Variations With Dipped Berries
Once you have a base dipped berry for strawberry cake decorating, variations multiply fast. Drizzle contrasting chocolate in thin lines across the set surface. Press edible gold leaf on before it fully sets. Dust with freeze-dried strawberry powder for a layered effect.
3: Placement and Anchoring on the Finished Cake
Place the largest dipped berries first in strawberry cake decorating, fill gaps with smaller ones, and press each berry about 3mm into the surface. A dab of stiff buttercream behind side-placed berries acts as adhesive.
Seasonal Adjustments Every Baker Should Plan Around:
Strawberry cake decorating doesn’t behave the same in July as it does in December. Berry quality, temperature, and frosting behavior all require real adjustments through the year.
- Summer: Peak berry quality but heat is the enemy — refrigerate until 20 minutes before serving; no cream cheese frostings at outdoor events
- Spring: Ideal conditions; fresh berries are excellent and decoration sessions have the longest working window before frosting softens
- Fall: Berry quality drops; supplement with freeze-dried accents and lean into chocolate-dipped preparations
- Winter: Out-of-season berries are often pale — use frozen-then-thawed berries inside layers and reserve fresh for garnish only
- Year-round: Freeze-dried whole berries and powder in your pantry solve 80% of the seasonal quality problem
Advanced Piping Techniques That Define Professional Results:
Piping is where strawberry cake decorating moves from home-baker into professional territory. The gap isn’t talent — it’s knowing which techniques pair with strawberry aesthetics and logging the repetitions.
Chill your crumb-coated cake for at least 30 minutes before piping anything. Warm surfaces cause buttercream to slide and rosette definition to soften before you can even step back to assess the result. This single habit explains most of the visible gap between home and professional work.
1: The 1M Rosette Border
The 1M tip rosette is the most recognized element in American strawberry cake decorating. Hold the bag at 90 degrees, rotate your wrist in a tight spiral from outside inward, then release pressure and pull straight up. Uneven pressure is the main failure point — every hesitation shows.
2: The Rope Border
A rope border using the 32 tip is underused in strawberry cake decorating but creates a perimeter that makes fresh berry placement much easier. It sits 3mm above the surface, creating a natural ledge that prevents halved berries from sliding off the edge.
3: The Star Cluster Fill
Star clusters — tight star tips pressed together between berry placements — fill negative space without precision required. Use the 2D tip, vary pressure slightly, and scatter in groups of three to five. The variation makes the surface look more complex than it was.
Common Mistakes and the Fastest Recovery Paths for Each:
Every baker doing strawberry cake decorating has ruined at least one cake in a way that taught them something. These are the most common failures and fastest fixes.
Bleeding color is the most frequent issue in strawberry cake decorating. Fresh-cut berries stain buttercream within 30 to 40 minutes. Spread a thin barrier of stiff white chocolate on the cut face before placement to prevent it. For a cake already bleeding, chill immediately to slow the spread. Piping that collapses means buttercream that’s too warm. Stop immediately, refrigerate the piping bag for 10 minutes, and re-pipe. Never push through warm, broken buttercream — the result degrades with every additional pass.
Berries rolling off the sides means the surface wasn’t tacky enough. A lightly chilled (not frozen) buttercream grips better than a freshly frosted one. This is a core principle of strawberry cake decorating. A toothpick at a slight inward angle through each berry’s base provides mechanical anchoring regardless of surface adhesion.
Photographing Your Work for Social Media Reach:
Creating a beautiful cake is only part of the process. If your strawberry cake decorating masterpiece is not photographed properly, many of the details and hours of work can go unnoticed. In today’s social media-driven world, good photography helps showcase your skills, attract more followers, inspire other bakers, and even generate potential customers if you sell cakes professionally. The good news is that you do not need an expensive camera or a professional studio to capture stunning images of your cake creations.
The first and most important factor in strawberry cake decorating photography is lighting. Natural light consistently produces the most attractive and realistic results. Position your cake near a window where soft daylight can illuminate the decorations evenly. Many photographers prefer a north-facing window because it provides gentle, consistent light throughout much of the day. Direct sunlight can be harsh and often creates strong shadows while washing out the vibrant red color of fresh strawberries. Soft natural light helps preserve the rich colors, delicate textures, and beautiful details that make strawberry cake decorating stand out.
The angle of your photo also plays a major role in how viewers experience the cake. A 45-degree angle is often considered the most flattering choice because it allows people to see both the top decorations and the height of the cake at the same time. This perspective gives a complete view of your design and helps highlight decorative elements such as piped frosting, fresh berries, chocolate drizzles, and elegant garnishes. When working on strawberry cake decorating projects that feature impressive layer structures, side-angle photographs can be especially effective because they reveal the interior filling and cake layers.
Background selection matters more than many bakers realize. A cluttered background can distract attention from your cake and reduce the visual impact of the image. Choose simple surfaces such as white tables, wooden boards, marble countertops, or neutral-colored backdrops. These backgrounds allow the bright colors of strawberries and frosting to become the focal point of the photograph. Since strawberry cake decorating naturally includes vibrant reds and soft cream tones, a clean background creates a professional and polished appearance.
Another useful technique is taking multiple photos from different perspectives. Capture overhead shots to showcase detailed strawberry arrangements on top of the cake. Take close-up images to highlight textures, frosting patterns, and fresh fruit details. Wide shots can display the entire cake presentation, including cake stands and decorative settings. Having a variety of images gives you more options when posting content across different social media platforms.
Props should be used carefully. A few fresh strawberries, a cake server, or a simple linen napkin can enhance the scene without overwhelming it. The goal is to complement the strawberry cake decorating design rather than compete with it. Less is often more when styling food photography.
Editing can further improve your results, but moderation is important. Small adjustments to brightness, contrast, and sharpness can make your images look more professional while keeping colors realistic. Over-editing may make strawberries appear unnatural and reduce the authenticity of your work.
Ultimately, great photography helps your strawberry cake decorating efforts receive the attention they deserve. By focusing on natural lighting, thoughtful angles, clean backgrounds, and simple styling, you can create eye-catching images that showcase your creativity and encourage more engagement across social media platforms. A well-photographed cake often reaches far more people than the cake itself ever could.
Summary
Strawberry cake decorating combines fresh fruit handling, buttercream technique, color theory, and timing into one integrated skill. The strongest results come from matching style to occasion, prepping berries to prevent bleeding, and piping onto a cold, firm surface. Freeze-dried berries, chocolate-dipped accents, and seasonal adjustments separate consistent results from lucky one-offs in strawberry cake decorating.
FAQ’s
Q1: How far in advance can I decorate a cake with fresh strawberries?
Place fresh strawberries no more than two hours before serving to prevent juice bleeding into frosting.
Q2: What frosting holds up best under strawberry decorations?
Swiss meringue buttercream provides the best balance of stability, smoothness, and tolerance for fresh berry moisture.
Q3: Can I use frozen strawberries for cake decorating?
Frozen strawberries thaw too wet for external decoration but work well inside cake layers or blended into filling.
Q4: How do I stop strawberries from sliding off the sides of a cake?
Insert a short toothpick at a slight inward angle through each berry’s base to anchor it mechanically into the frosting.
Q5: What tip size is best for rosettes on a strawberry cake?
The Wilton 1M or ATECO 846 tip produces the most defined, photo-ready rosettes for strawberry cake decorating.
Conclusion
Strawberry cake decorating rewards the baker who plans before touching the piping bag. Select your style based on your timeline. Prep berries to stop the bleed. Match your frosting to your climate. Those three decisions alone put your strawberry cake decorating ahead of 90% of what’s competing at any table.