I once spent an entire October weekend testing twelve different halloween cake decorations concepts for a school fundraiser bake sale, ranging from fondant spiders to mirror glaze blood drips. The fondant spiders took four hours and barely sold, while a simple black buttercream cake with candy eyeballs and orange ganache drips sold out in under six minutes.
Halloween cake decorations separate the forgettable party desserts from the ones that get photographed, shared, and talked about for weeks.
The difference between a terrifying masterpiece and a sad Halloween cake is never talent — it’s always knowing which techniques are worth your time.
Why Halloween Cake Decorations Require a Different Creative Mindset:
Standard cake decorating prioritizes elegance and precision. Halloween cake decorations flip that entirely. Here, imperfection becomes a feature, drips look intentional, and the more unsettling the visual, the better the result.
- Dark buttercream and ganache hide minor surface flaws that would ruin other cakes
- Intentional “messy” textures like splattered edible blood are faster than smooth finishes
- High-contrast colors — black, orange, deep purple, bloodred — photograph dramatically
- Themed toppers and edible prints require zero piping skill yet deliver maximum impact
- Halloween’s visual vocabulary is so strong that even minimal decoration reads as intentional
This niche operates in a creative space where the rules of classic cake design actively work against you if you follow them.
Essential Tools for Creating Halloween Cake Decorations:
The right tools make Halloween cake decorations faster, cleaner, and more professional-looking. You don’t need a full professional kit, but a few specific items are genuinely non-negotiable for consistent results across different design styles.
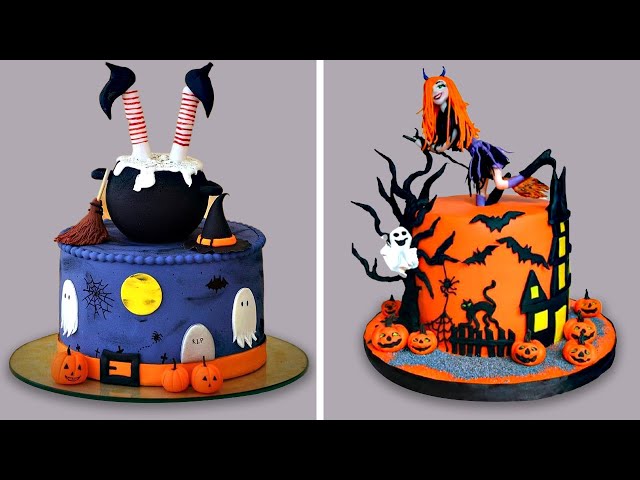
When decorating for parties, it is often helpful to coordinate the cake design with the overall event theme. A monster-themed celebration may feature bright green frosting and playful edible eyes, while a haunted mansion theme might use black, gray, and purple color palettes for a more mysterious look. Matching decorations help create a cohesive dessert table that guests will remember long after the event ends.
For beginners, preparation is the key to success. Decorating elements can be made in advance, allowing more time to focus on assembling the final design. Chilling the cake before decorating helps maintain clean edges and makes piping details easier. Most importantly, Halloween cakes do not need to be perfect. Slightly uneven spider webs, crooked ghosts, or imperfect pumpkin faces often add character and charm to the finished creation. The holiday celebrates creativity and fun, making it the perfect opportunity to experiment with new decorating ideas and enjoy the process as much as the final result.
Black gel food coloring is the single most critical ingredient in any Halloween decorator’s toolkit. Achieving true black buttercream requires a high-concentration gel color — liquid black coloring produces gray, not black, no matter how much you add. Beyond that, offset spatulas, a squeeze bottle for drips, piping bags with round and star tips, and a quality turntable handle the vast majority of projects at every skill level.
1:Black Gel Food Coloring That Actually Works
Brands like Cheermaster and AmeriColor produce the concentrated black gel that achieves true black without the gray undertone that ruins so many Halloween buttercream attempts. Start with one tablespoon per two cups of frosting and allow it to rest for thirty minutes — black deepens as it sits.
2:Silicone Molds for Themed Shapes
Skull, spider, bat, and pumpkin silicone molds let you produce multiple identical fondant or chocolate accents in minutes. Consistency across multiple themed elements creates a cohesive look that random, hand-shaped decorations struggle to match.
3:Edible Spray Paints and Luster Dusts
Black and gold edible spray paints over dried fondant elements create a metallic, high-end look with almost no skill requirement. Luster dusts applied dry with a brush add shimmer to witch hat fondant pieces or spiderweb details that flat-painted effects can’t replicate.
Classic Halloween Cake Decorations Anyone Can Master:
Not every halloween cake decoration needs advanced technique. Several of the most visually effective designs require basic skills and common grocery store supplies.
Classic halloween cake decorations that consistently perform well for home bakers include: Oreo crumble “dirt” with plastic skeleton hands emerging from the top, candy corn pressed in concentric rings across the surface, black-tinted buttercream with orange piped pumpkin faces using a round tip, ghost shapes piped in white buttercream over a dark base, and a simple mummy wrap using white fondant strips over chocolate ganache. None of these requires more than thirty minutes of active time once the base cake is frosted and chilled.
Another reason halloween cake decorations remain so popular is their flexibility. A single cake can be transformed into dozens of different themes simply by changing the colors, toppings, and decorative elements. Bakers who prefer a cute and family-friendly appearance often choose smiling pumpkins, friendly ghosts, colorful sprinkles, and candy decorations. Those looking for a more dramatic effect may incorporate dark buttercream, realistic spider webs, edible blood drips, or haunted house toppers to create a striking centerpiece.
Texture also plays an important role in creating visual interest. Crushed cookies can mimic graveyard soil, shredded coconut can be colored green to resemble eerie moss, and melted chocolate can be drizzled to create the appearance of tree branches or spooky cracks. Even simple additions such as chocolate bats, sugar eyes, or themed cupcake toppers can instantly elevate a basic cake into a festive Halloween dessert.
1: The Dirt Cake Graveyard
Crush twenty Oreos into fine crumbs, spread over a chocolate frosted cake, then press rectangular pieces of white fondant (etched with “RIP” using a toothpick) vertically into the crumbs. Add a few plastic skeleton hand picks and a couple of gummy worms breaking the surface.
2: Ghost Buttercream Piping
Use a large round piping tip and white buttercream. Squeeze firmly at the top, release pressure gradually while lifting, then pull to a slight point at the base. Two small black royal icing dots for eyes complete each ghost. Works on any dark-frosted cake surface.
3: Spider Web Ganache Design
Pipe a white chocolate ganache spiral from center outward on a dark chocolate ganache base. While still wet, drag a toothpick from center to edge eight times at equal intervals, then from edge to center between those lines. The web forms in under two minutes.
Fondant Techniques for Advanced Halloween Cake Decorations:
Fondant expands what’s possible with halloween cake decorations enormously. Sculpted skulls, draped cobwebs, witch hats, and three-dimensional pumpkins all become achievable with basic fondant skills and the right coloring.
- Knead tylose powder into fondant to speed drying time for structural pieces
- Always color fondant with gel food coloring, never liquid — liquid breaks the texture
- Rest colored fondant in cling wrap for fifteen minutes before sculpting to remove stickiness
- Use a small amount of vegetable shortening on hands when kneading to prevent cracking
- Dust finished fondant pieces with cornstarch to prevent them sticking to work surfaces
Pre-make all fondant elements at least twenty-four hours ahead of the final cake assembly for maximum firmness and structural integrity. Elements made the same day as the cake assembly frequently bend, crack, or soften under their own weight before the event even begins.
Ganache Drip Techniques for Halloween Cake Decorations:
Ganache drips are the backbone of the most popular modern halloween cake decorations. The color, temperature, and application method each contribute to whether a drip reads as intentional and dramatic or sloppy and accidental.
Black ganache drips over bright orange buttercream produce the most striking color contrast possible for any Halloween cake. Red ganache — achieved using AmeriColor Super Red gel in white chocolate ganache — simulates blood drips over white or pale buttercream. The technique for both is identical — only the base chocolate and colorant shift.
1: Black Ganache for Halloween Drips
Melt dark chocolate with heavy cream in a 1:1 ratio by weight. Add black gel food coloring to the warm ganache — three to four teaspoons per cup is typical for true black rather than very dark brown. Cool to exactly 90°F before dripping over a fully chilled, frosted cake.
2: Red “Blood” Drips Using White Chocolate
Use white chocolate ganache at a 1:1.5 ratio (chocolate to cream) for a slightly thinner consistency that flows more dramatically. Add super-red gel coloring until deeply saturated. Test a single drip on the back of the cake first — if it runs too fast, cool the ganache further before proceeding.
3: Layering Multiple Drip Colors
Apply the base drip color first and allow it to set for fifteen minutes in the refrigerator before adding a contrasting color. Black over red, or red over black, creates depth and visual complexity that single-color drips can’t match on any dark festive cake.
Themed Topper Styles for Halloween Cake Decorations:
Toppers provide the fastest visual transformation of any technique covered here. Whether store-bought or handmade, a strong topper transforms a plain frosted cake into an immediate seasonal statement.
- Plastic skeleton figures, cauldrons, and witch silhouettes press directly into frosting
- Fondant pumpkin clusters modeled in orange and black fondant work at every skill level
- Edible printed images on wafer paper or frosting sheets create photorealistic designs
- Sparkler-style number candles in orange and black suit adult Halloween birthday cakes
- Chocolate transfer sheets printed with spider web or skull patterns wrap entire cake tiers
| Topper Type | Skill Required | Time to Make/Apply | Cost Estimate | Reusable? |
| Plastic character picks | None | Under 5 min | $3-8 | Yes |
| Fondant skulls (hand-molded) | Intermediate | 30-45 min | $2-4 | No |
| Silicone-molded chocolate bats | Beginner | 20 min + set time | $3-6 | Molds yes |
| Edible wafer paper print | None | Under 5 min | $5-12 | No |
| Sculpted fondant witch hat | Intermediate | 45-60 min | $3-5 | No |
| Chocolate transfer sheet wrap | Beginner | 10-15 min | $8-15 | No |
| Royal icing flat spiders | Intermediate | 30 min + dry time | $1-3 | No |
| Ganache drip (black or red) | Beginner | 30-45 min | $4-8 | No |
Color Theory for Halloween Cake Decorations:
Color is the most powerful tool in halloween cake decorations. Palette creates atmosphere before anyone registers a single design element.
Classic halloween cake decorations rely on the traditional orange-black pairing, but limiting yourself to those two colors often produces results that look more like clip art than a crafted cake. Extending the palette to include deep purple, blood red, bone white, and metallic gold or silver creates a more sophisticated, genuinely eerie result. Monochromatic black cakes accented with neon green or orange have dominated social media trends precisely because restraint makes the accent color feel intentional and powerful.
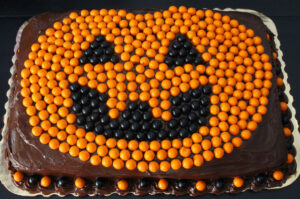
1: Classic Orange and Black Execution
Black buttercream base with orange piped accents — jack-o-lantern faces, dripped borders, and pressed candy corn — represents the most recognizable seasonal palette. It photographs clearly and reads as Halloween from across a room.
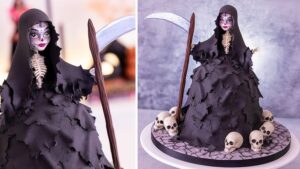
2: Gothic Moody Palette
Deep purple, black, and gold luster dust create gothic designs that suit adult parties and elegant events. This palette avoids the obvious trick-or-treat visual language while remaining seasonal through motifs like skulls, ravens, and moon phases.
3: Neon Horror Palette
Neon green “slime” drips made from tinted white chocolate over a black buttercream base, combined with glow-in-the-dark edible spray, create the high-energy festive aesthetic that younger audiences respond to most strongly.
Beginner-Friendly Halloween Cake Decorations With High Impact:
Not everyone has hours or advanced skill, but halloween cake decorations don’t require either to look impressive.
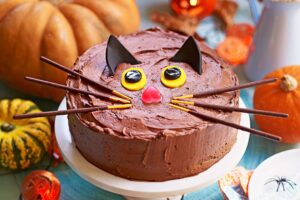
- Press candy eyes across the entire top surface of a frosted cake for an instant monster look
- Use a stencil and black cocoa powder to dust a spiderweb over white frosting
- Stick plastic spiders around the sides at irregular intervals on any dark frosted cake
- Pour orange and black sprinkle mix across the entire top as a complete, standalone finish
- Drizzle melted orange and black candy melts freehand across a white frosted cake
Each of these takes under twenty minutes combined and looks immediately festive.
Spooky Piping Techniques for Halloween Cake Decorations:
Piping skills translate directly into the most visually impressive handmade halloween cake decorations. Even one or two mastered tips produce results that look professional and take far less time than most bakers expect once the muscle memory develops.
Tip 233 — the grass or hair tip — piped in black buttercream creates a monster-fur texture that covers an entire cake tier with just one pass. Tip 1A piped in white creates large, dramatic ghosts in seconds. Ruffled piping with a petal tip in deep purple gives a draping, haunted-curtain texture that reads as gothic without requiring any specific artistic skill. For text-heavy spooky messages, a round tip 2 or 3 gives enough control for clean lettering on a dark background when the cake is chilled before writing.
1: Monster Fur Texture With Tip 233
Load black buttercream into a bag fitted with tip 233. Hold perpendicular to the cake’s surface, squeeze firmly, and pull away quickly. Repeat across the full surface in an irregular pattern — the irregularity is the point. Add candy eyes randomly for a classic monster look.
2: Gothic Ruffled Tier Using Petal Tip
Hold the petal tip with the wide end touching the cake and the narrow end pointing outward. Apply steady pressure while moving the piping bag in a horizontal rocking motion. The resulting ruffles, especially in deep purple or black, give a Victorian-gothic quality that works beautifully for adult Halloween parties and events.
Storage and Serving Halloween Cake Decorations Safely:
Halloween cake decorations present unique storage challenges. Black buttercream, in particular, can bleed color onto surrounding frosting if stored improperly against other elements.
Store any halloween cake decoration involving black buttercream uncovered in the refrigerator for at least thirty minutes before boxing, allowing the surface to crust and preventing color migration. Fondant elements should never be stored in a sealed humid environment — condensation causes colors to bleed and surfaces to become sticky. Keep any cake with plastic decorative picks refrigerated and remove all non-edible elements immediately before cutting and serving. Transport in an air-conditioned vehicle and placed on a flat, non-slip surface.
Ganache drips on Halloween cake decorations firm up considerably when refrigerated, which actually makes transport safer — the drips are less likely to flow further or smear during movement. If a drip smears during transit, it almost always reads as intentional spatter once the cake is on the serving table. One of the few decorating situations where accidents benefit the final result.
Buying vs. Making Halloween Cake Decorations:
Time pressure is real. Knowing which Halloween cake decorations are worth making versus buying saves hours and delivers better results.
- Edible wafer paper prints: always buy — home printing quality rarely matches commercial
- Fondant skulls and bats: make if you have a silicone mold, otherwise buy pre-made
- Black buttercream: always make — store-bought versions are consistently poor quality
- Candy eyes and sprinkle mixes: always buy — making these is never worth the time
- Ganache drips: always make — the control and quality difference is significant
These decisions, made before starting any Halloween project, determine whether your decorating session finishes in two hours or six. The general rule is this: buy anything edible that doesn’t require skill or customization, make anything that directly affects color depth, texture, or structural integrity. Black buttercream from a grocery store will always look gray. Ganache drips from a box will never flow with the precision of a scratch-made batch cooled to the right temperature. Spend your time where it actually changes the visual outcome.
Summary
Halloween cake decorations require bold color choices, the right gel food colorings, and a clear visual concept built around three to four elements rather than a cluttered design. This guide covers ganache drip techniques, fondant work, piping methods, color theory, and storage protocols. Whether beginner or experienced, these methods produce genuinely striking results every October without exception.
FAQ’s
Q1: What food coloring makes the best true-black buttercream for halloween cake decorations?
Chefmaster or AmeriColor concentrated black gel delivers true black without any gray undertone.
Q2: How far ahead can I make fondant pieces for halloween cake decorations?
Fondant pieces can be made up to two weeks ahead and stored in an airtight container.
Q3: What’s the easiest halloween cake decorations idea for total beginners?
Pressing candy eyes across a frosted black buttercream cake takes under five minutes total.
Q4: How do I stop black buttercream from bleeding onto other frosting colors?
Chill the decorated cake uncovered for thirty minutes to form a skin before adding other colors.
Q5: Can ganache drips be made in different colors for halloween cake decorations?
Yes — white chocolate ganache accepts any gel food color, including black, red, orange, and purple.
Conclusion
Halloween cake decorations reward boldness over perfection. Use true black gel coloring, master one drip technique, and let the season’s visual language carry the design. Choose three to four elements maximum, execute each one cleanly, and your finished cake will outperform anything overloaded with too many competing ideas. Start with the technique that excites you most, not the one that looks the most complicated — enthusiasm produces better results than ambition almost every time.