I once spent three hours decorating a chocolate cake for a colleague’s going-away party — piped chocolate ganache rosettes, hand-tempered chocolate shards, and edible gold dust across the top. That experience proved something I now tell every baker I work with: decorating chocolate cake is a learnable skill, not a talent people are simply born with.
Decorating chocolate cake separates bakers who make great-tasting desserts from those who make unforgettable ones. Technique, timing, and tool selection define the outcome every single time.
Once you commit to learning these methods, decorating chocolate cake will never feel intimidating again.
Why Decorating Chocolate Cake Is Uniquely Challenging:
Chocolate cake presents specific visual and structural challenges that vanilla or funfest cakes don’t. Dark crumb, high moisture content, and dense layers require decorators to think differently about every technique they apply.
- Dark crumb bleeds through thin frosting layers, requiring a thorough crumb coat
- High oil content in most chocolate cake recipes makes frosting adhesion trickier
- Chocolate ganache as a topping reacts to room temperature more than buttercream
- Cocoa powder in the batter can dry out surface layers, affecting how decorations hold
- Chocolate’s visual darkness makes color contrast choices more critical than on lighter cakes
Decorating chocolate cake requires a different mindset from the moment you level the first layer.
Tools Every Baker Needs When Decorating Chocolate Cake:
Skipping proper equipment is the single most common reason decorating chocolate cake results look amateurish. You don’t need fifty gadgets — but these specific tools make a measurable difference.
A ball-bearing turntable, offset spatula in two sizes, a quality bench scraper, piping bags, and at least five interchangeable tips form the core kit. Beyond those, a thermometer for ganache work, a squeeze bottle for drip control, and parchment paper for transfer work round out everything a serious baker needs.
1: Turntable Selection for Chocolate Cake Work
Heavy aluminum turntables spin with zero wobble under dense, multi-layer chocolate cakes that can exceed ten pounds. Cheap plastic models flex under that weight, producing wavy frosting lines no amount of skill can fix.
2: Piping Tips That Suit Chocolate’s Aesthetic
Tip 1M produces classic swirled rosettes that complement chocolate’s rich visual weight. Star tips 4B and 6B create open, ruffled shapes with more air and lightness, balancing chocolate’s visual density when paired with cream or white-tinted elements.
3: Thermometers for Ganache Precision
Chocolate ganache for drips needs to hit exactly 90°F before application — any warmer and it runs straight off the cake, any cooler and it sits in thick globs at the top edge. An instant-read thermometer is non-negotiable for consistent results.
The Perfect Crumb Coat for Decorating Chocolate Cake:
No decorator skips the crumb coat. None. It’s the single step that separates a polished finish from a muddy, crumb-filled disaster, and decorating chocolate cake makes this step even more critical because dark crumbs are visually obvious against any light-colored frosting.
The crumb coat process for decorating chocolate cake involves applying a thin, deliberate layer of frosting that traps all loose crumbs against the cake. Chill for at least twenty minutes until firm before applying the final coat. Skipping the chill time is skipping the point — the crumb coat has to set before anything else touches the cake.
1: How Thick the Crumb Coat Should Be
No thicker than an eighth of an inch, applied with consistent pressure using an offset spatula. Thick crumb coats don’t set fully and can drag crumbs into the final layer when you come back to frost.
2: What Frosting to Use for the Crumb Coat
American buttercream works for most applications. Swiss meringue buttercream, though silkier, can be too soft for a crumb coat on dense chocolate cake since its emulsified structure slides slightly. Chocolate ganache crumb coats work brilliantly when the final layer will also be ganache.
3: Chilling Time and Environment
Twenty minutes in a refrigerator set to 38-40°F works for most cases. If your kitchen runs warm, extend that to thirty minutes. A crumb coat that isn’t fully chilled shifts when you apply the final coat and pulls loose crumbs back to the surface.
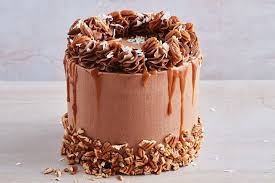
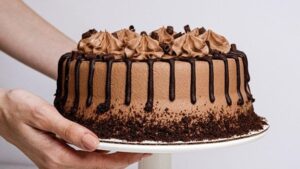
Ganache Drip Technique for Decorating Chocolate Cake:
Ganache drips are one of the most recognized techniques in modern decorating chocolate cake work, and also one of the most commonly botched. The ratio, temperature, and application method all affect whether drips look controlled or chaotic.
- Use a 1:1 ratio of heavy cream to dark chocolate by weight for standard drips
- Heat cream to just below boiling — around 200°F — before pouring over chopped chocolate
- Rest undisturbed for two full minutes before stirring from the center outward
- Cool ganache to exactly 90°F for drips on a chilled, fully frosted cake
- Test a single drip on the back of the cake before doing the full ring
Getting this sequence right every single time is what makes ganache drip work look effortless on any chocolate cake.
Buttercream Textures and Finishes for Decorating Chocolate Cake:
Decorating chocolate cake with buttercream offers more textural options than most bakers realize. Smooth, raked, ruffled, and palette-knife textured finishes each produce a completely different visual result from the same basic frosting material.
Smooth buttercream requires a properly chilled cake, a warm bench scraper, and multiple slow passes. Raked texture uses a cake comb pressed against the side while the turntable spins, leaving horizontal or diagonal lines. Palette-knife texturing, popular for rustic results, uses random swipes and swirls that hide any imperfections while looking completely intentional — a huge advantage when decorating chocolate cake for beginners still building consistency.
1: Achieving a Perfectly Smooth Finish
Warm your bench scraper in hot water, dry it, then hold it against the frosted side of the cake at a 45-degree angle while spinning the turntable steadily. Repeat the warming step every two to three passes. This technique removes streaks and pulls the frosting flush without dragging.
2: Raked and Combed Finishes
Cake combs with different tooth sizes produce different stripe widths and depths. Press the comb lightly for shallow lines, firmly for deeper channels. Horizontal lines with chocolate-dark frosting give a sophisticated, almost architectural look.
3: Rustic Palette-Knife Texturing
Dab and drag small amounts of frosting with the tip of a palette knife to build layered, organic texture. Mix two shades of frosting — dark chocolate and a lighter coffee tone — applied in alternating dabs for a natural, painterly effect.
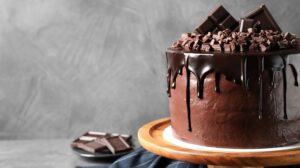
Chocolate Decorations You Can Make at Home:
Store-bought decorations have their place, but handmade chocolate elements elevate the visual quality of decorating chocolate cake in ways no pre-packaged product can fully replicate. The most impressive results almost always involve at least one handmade chocolate component.
- Chocolate bark: spread tempered chocolate thin on parchment, scatter toppings, break into irregular shards
- Chocolate curls: drag a vegetable peeler across a room-temperature chocolate bar at a 45-degree angle
- Chocolate cigarettes: spread thin tempered chocolate on marble, scrape with a bench scraper at low angle
- Piped chocolate decorations: melt chocolate into a piping bag and freehand shapes onto parchment
- Chocolate lace: pipe intricate patterns in thin lines, let set, then peel and drape around the cake
| Decoration Type | Skill Level | Time Required | Temp Sensitivity | Best Used On |
| Ganache drip | Beginner-Intermediate | 30-45 min | High (90°F critical) | Naked, semi-naked, rosette top |
| Chocolate bark shards | Beginner | 30 min + set time | Medium | Tall cakes, dramatic centerpieces |
| Chocolate curls | Beginner | 10 min | Low | Quick everyday finishing |
| Piped rosettes (buttercream) | Intermediate | 45-60 min | Medium | Birthday, celebration cakes |
| Mirror glaze | Advanced | 1.5-2 hours | Very high | Special events, showpieces |
| Marzipan sculpts | Intermediate | 1-2 hours | Low | Themed cakes, storytelling designs |
| Gold leaf accents | Intermediate | 15-20 min | Low | Wedding, luxury event cakes |
| Chocolate lace | Advanced | 1-2 hours | High | Elegant, fine-dining aesthetic |
| Fondant panel work | Advanced | 2+ hours | Medium | Formal, structured designs |
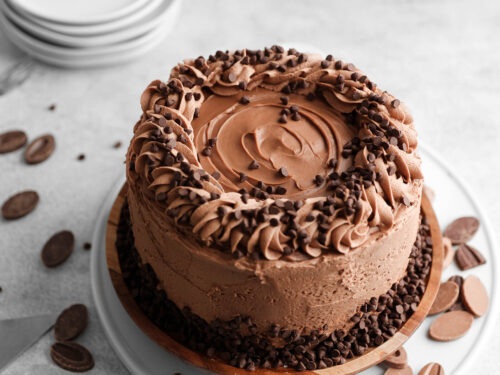
Piped Decorations That Transform Decorating Chocolate Cake:
Piping skills directly translate to professional-looking results, and decorating chocolate cake with piped elements gives you total control over where visual interest lands on the finished product.
Rosettes piped with tip 1M across the entire top surface of a chocolate cake create a lush, full-coverage look that requires no other decoration. A border of shells or rope piping around the base using a star tip adds definition between the cake board and the sides. For more intricate decorating chocolate cake work, combining multiple piping techniques — rosettes on top, rope border at the base, and ruffle piping along a middle horizontal band — creates tiered visual complexity without ever reaching for a fondant roller.
1:Top Rosette Arrangements
Start from the outer edge and work inward, keeping consistent pressure and release height on every rosette. Irregular pressure produces rosettes of different sizes, which looks unintentional. A center rosette placed last covers the inevitable gap where all the outer ones meet.
2: Border Piping at the Base
The base border anchors the cake visually and hides any gap between the frosting and the cake board. The shell borders the pipe naturally by applying pressure, then releasing and lifting in a forward motion — each shell slightly overlapping the tail of the previous one.
3: Combining Multiple Piped Elements
Use contrasting frosting colors sparingly. On a dark chocolate cake, white or ivory piped accents create maximum contrast without competing. Too many colors in a piped design fragment the eye and reduce overall impact.
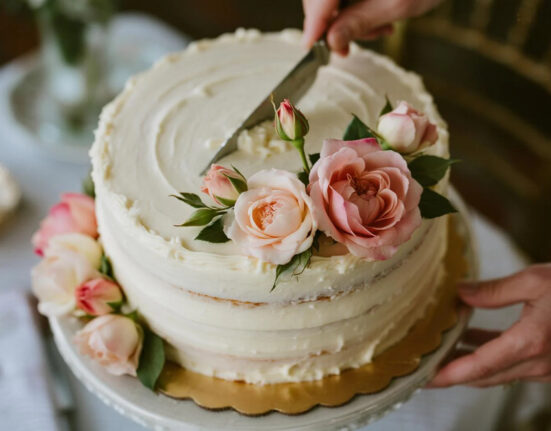
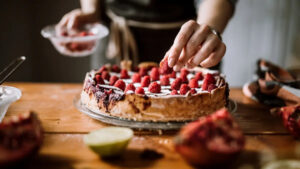
Fresh Flowers and Natural Elements on Decorating Chocolate Cake:
Fresh flowers on chocolate cake create an immediate, high-impact result that photographs brilliantly. The contrast of organic, colorful blooms against deep chocolate frosting is one of the most visually compelling combinations in cake decoration.
- Always use pesticide-free, food-safe flowers — not all flowers are edible or safe
- Place flowers on food-safe flower picks rather than inserting stems directly into cake
- Remove flowers immediately before cutting and serving — stems are not for eating
- Pair warm-toned flowers like ranunculus, garden roses, or marigolds with chocolate
- Fresh herbs like rosemary or thyme between flowers add texture without competing visually
Fresh elements wilt within hours, so add them no more than two hours before serving for best results when decorating chocolate cake for events.
Seasonal and Themed Decorating Chocolate Cake Ideas:
Themes and seasons give decorating chocolate cake a built-in creative direction that removes the paralysis of too many options.
Fall themes call for deep orange and burgundy chocolate transfers, pressed pecan halves, cinnamon sticks, and caramel drips alongside the chocolate ganache. Winter holiday work benefits from peppermint bark crumbles, white chocolate “snow” poured thin and cracked into shards, and dusted edible silver. Spring versions lean on fresh florals, pastel white chocolate drips alongside dark ganache, and scattered edible petals that add color without fussiness.
Fall and Harvest Themes Press pecan or walnut halves around the base, drizzle caramel between chocolate ganache drips, and dust the top with a fifty-fifty mix of cocoa powder and cinnamon for a warm, spiced aesthetic that signals season without a word.
1: Winter Holiday Themes
White chocolate shards dusted with edible silver, a single sprig of sugared rosemary at the center, and crushed peppermint candy pressed into the lower third of a smooth ganache-coated cake create a genuinely festive result.
2: Summer and Spring Color Themes
White chocolate elements tinted with oil-based pastel food colors create drips, splattered effects, or piped accents that contrast sharply with dark chocolate. Oil-based coloring is mandatory for white chocolate — water-based coloring seizes it immediately.
Color Theory When Decorating Chocolate Cake:
Color decisions make or break decorating chocolate cake work. Dark chocolate provides an unusually rich backdrop that makes almost any accent color pop — but the wrong combinations still clash.
White and ivory always work cleanly against chocolate. Gold reads as luxurious. Dusty rose, sage green, and deep burgundy all pair beautifully with dark chocolate tones in ways that bright primary colors generally don’t. For decorating chocolate cake in a modern, editorial style, monochromatic schemes using dark chocolate, mid-tone coffee buttercream, and light cream accents feel current without relying on trends that date quickly.
Avoid over-saturated greens and blues directly against dark chocolate without a white or gold buffer tone between them — these combinations tend to read as discordant regardless of how skillfully the decoration is applied.
Storage and Presentation After Decorating Chocolate Cake:
A finished, decorated chocolate cake needs proper handling to preserve the work. Temperature is the enemy of most professional decorating chocolate cake results — ganache drips soften, chocolate shards bloom, and buttercream rosettes lose definition in warm environments.
Refrigerate the finished cake uncovered for twenty minutes to set all elements before boxing.
Transport flat, on a non-slip mat, with enough vertical clearance for any upright decorative elements. Remove from refrigeration thirty minutes before serving to allow buttercream to soften and chocolate flavors to bloom fully. Presenting a decorated chocolate cake on a cake stand elevated six to eight inches above the table level gives it visual authority that a flat board on a table simply cannot match.
1: Boxing and Transport Protocol
Use a rigid cardboard box with a vented top. Humidity trapped inside a sealed box can cause condensation on chocolate surfaces, creating white bloom marks that ruin an otherwise flawless finish.
2: Pre-Service Presentation Checklist
Check all piped elements for pressure cracks that appeared during refrigeration. Touch up with a small offset spatula. Wipe the cake board edge clean of any smears. Place fresh elements — flowers, herbs, or gold leaf — after the cake reaches its presentation location, not before transport.
Common Mistakes That Ruin the Finished Result:
Mistakes in decorating work are almost always repeatable, predictable, and preventable. The same issues show up across skill levels: frosting a warm cake causes sliding and structural collapse; skipping the crumb coat creates crumb-contaminated final layers that no patching fixes; using ganache that’s too warm produces runaway drips; over-piping with too many elements fragments the design; applying gold leaf in a humid kitchen causes it to wrinkle and stick to itself. Document every session — what worked, what temperature the ganache was, how long the crumb coat chilled. That log becomes more valuable than any tutorial after six months of consistent practice.
Summary
Decorating chocolate cake at a professional level requires the right tools, temperature control, and layered technique. This guide covers crumb coating, ganache drips, piped elements, fresh flower placement, seasonal themes, and color theory. Whether you’re just starting out or refining advanced skills, these decorating chocolate cake methods deliver consistent, polished results at every level of experience.
FAQ’s
Q1: What’s the best frosting for decorating chocolate cake?
Swiss meringue buttercream or stabilized ganache produce the smoothest, most professional-looking finish.
Q2: How do I stop ganache drips from running too far?
Cool ganache to exactly 90°F and always test one drip before doing the full ring.
Q3: Can I decorate a chocolate cake the day before serving?
Yes, refrigerate overnight uncovered then bring to room temperature thirty minutes before serving.
Q4: What piping tip is best for beginners decorating chocolate cake?
Tip 1M is forgiving, versatile, and produces impressive-looking rosettes even with inconsistent pressure.
Q5: How do I attach chocolate shards without them sliding off?
Press shards into slightly soft buttercream at a slight inward angle for maximum hold.
Conclusion
Decorating chocolate cake rewards discipline over creativity, at least in the beginning. Learn the crumb coat, nail ganache temperature, master one piping tip before moving to five. Every professional result you admire was built on these fundamentals, repeated hundreds of times until they became automatic.